I was searching a lot for tools which can generate reports for me in sharepoint for many requirements like site usage, find the modified item in a document library, who all have modified a document in a document library, who had mad changes in the site..
The final answer on how to acheive all the same was simple.
Use Sharepoint Designer 2007
Yes, you can generate all the reports, create charts and even export them to excel from the sharepoint designer 2007. Open your site using sharepoint designer and at Site -> Reports, you can find almost all the options you are looking for......
Find this how to Article with more details.
Wednesday, December 23, 2009
Friday, December 18, 2009
Restrict document library from uploading and opening in Explorer view
Are you trying to restrict sharepoint users from adding files to the sharepoint document library via, Upload document option and using 'Drag and Drop' after opening in Explorer view.
You can acheive this by just adding some javascript codes to the page.
So heres how it can be done ...........
You are done with what you were looking for
You can acheive this by just adding some javascript codes to the page.
So heres how it can be done ...........
Open the document library where you want to restrict the upload and open in explorer view option.
Add a Content Editor Webpart to the page.
In the tool pane of the CEWP - Source Editor.- Add the below javacript codes.
Delete the explorer view of document library.
Tuesday, December 8, 2009
Export to excel
IF you find export to excel not working in any version of sharepoint installed then try out this noce solution which helps you out.
Download- Run - Activate , you are done to use the feature.
Download it from : http://www.vana.in/Pages/ExportToExcel.aspx
Download- Run - Activate , you are done to use the feature.
Download it from : http://www.vana.in/Pages/ExportToExcel.aspx
Tuesday, November 3, 2009
Who deleted the site/list/library
Hi All,
I was asked by many queries how to find the person who deleted the site, list, library. list column etc... in a sharepoint site.
Today i found the solution.
Configure your IIS logs for all the sites on Hourly basis at IIS - website - Right click - properties- Website - Enable logging - properties ( assgin an easy path) -Advanced- Hourly.
TO find th eperson who deleted, find the edit page in the IIS logs and find the name added to it.......
site >> "/_layouts/deleteweb"
list >> "/_layouts/editpage"
list column >> "_layouts/FldEditEx.aspx" etc....
Thursday, October 15, 2009
Archive contents from Team Discussion
Steps : To archive the contents from the Team Discussion
1. Open 'Team Discussion'
2. Create a new view from 'Settings' - New View
3. In 'Columns'- Check the 'Body' field- OK
4. Open the newly created view and from 'Actions' select 'Export to spread sheet'.
5. Open the file in Excel and save it to your archive destination.
Note: The above steps will not save any attachments in the mails, For archiving the attachments.
1. On you computer - Open 'My Network Places'.
2. Under 'Network Tasks' click on Add a network place
3. Click 'Next'- Select Choose another service provider option - Next
4. Add the above url of the 'Team Discussion' as network address- Next
5. Give a new name - Next - Finish
6. A new web page will be opened with Folders for each mail.
7. Select the folders with the attachment and save them. ( The folders name will be same as the subject of the mail)
Labels:
Archive contents,
Discussion Board,
Team Discussion
Wednesday, September 9, 2009
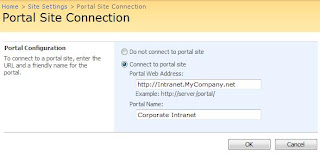
Update Global Navigation Link
I was looking for a way to update the global navigation breadcum in a sharepoint site and doesn't found any valid solutions. 

Today i got a chance to refer a white paper published by microsoft which gives the steps which many may have noticed.


You can edit the portal site link at
Site Action site settings --> Under Site Administration -->Portal Site Connection.
Cheers!
Wednesday, July 1, 2009
Remove #NUM from the list data difference
To remove the #NUM from the resilt of taking difference between two sharepoint column values.
Here is a scenario :
There are two dates , date1 and date 2
date 2 - date1 will give result if date 2 is after date1, if not it will give the result #NUM
This can be resolve by using this formula :
=IF(ISERROR(DATEDIF(Date1,Date2,"d")), -DATEDIF(Date1,Date2,"d"))
If the difference between the two dates is negative ( ie, Date1 - Date2 = -ve value ) then it will return -(Date2-Date1)
for eg : 2008/02/02 - 2008/02/01 will give 1 as value, but 2008/02/01 - 2008/02/02 will give #NUM as result normally, but the above calculated will give -1 as result.
Cheers!!
Tuesday, June 23, 2009
Calculate age in sharepoint list
Hi All,
i started trying to answer a question in mocrosoft forums which has gone a long way today and this is my third editing of the post.
How to calculate age in a sharepoint list with only date of birth available.
it can be done with the formula listed below :
=FLOOR((DATEDIF(DOB,Todaydate,"d")-(ROUND(((YEAR(Todaydate))-YEAR(DOB))/4,0)))/365,1)
Now i will explain what the fields are:
DOB- date of birth Field in the sharepoint list.
Todaysdate - gives you the date today but need to carry difficult step to get it. you cannot get todays date directly anywhere in sharepoint list, thats sure.
i got it via, the steps given at :
http://abstractspaces.wordpress.com/2008/05/19/use-today-and-me-in-calculated-column/
now what the formula does :
First it takes the difference between todays date and DOB. then substracts the no of leap years from it, divide it by 365 and took a round value.
Cheers!!!
Labels:
Age,
calcualted column,
Calculate,
Date Of Birth,
sharepoint
Monday, June 22, 2009
Wednesday, March 11, 2009
Content Query Webpart customization
In sharepont if you want to show the contacts from another site in your site the best option is to go for content query web part , the advantage is that when ever a change happens to contact in the site will get autoupdate in the CQWP.
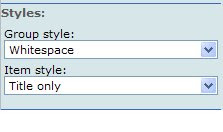
When you try to add the 'Contact' list from another site, You will come across one constrain usually, ie. the display of div tags below the contact name.
You don't have to go for any other editors to sort out the issue.
One simple solution is to play with the 'Presentation' of the CQWP page.
You can remove the tags div easily by changing the CQWP style as shown below.

And what if you want to show all the fields other than the 'Title: Last Name' field.
You have got 2 options:
1. Open Sharepoint Designer and edit the CQWP.
2. Open 'Managed Contents and structure' option and edit the style library - item style.
Refer for details at:
http://www.helloitsliam.com/archive/2007/07/19/moss2007-%E2%80%93-show-multiple-columns-in-cqwp.aspx
Happy Customization!!!!!
When you try to add the 'Contact' list from another site, You will come across one constrain usually, ie. the display of div tags below the contact name.
You don't have to go for any other editors to sort out the issue.
One simple solution is to play with the 'Presentation' of the CQWP page.
You can remove the tags div easily by changing the CQWP style as shown below.

And what if you want to show all the fields other than the 'Title: Last Name' field.
You have got 2 options:
1. Open Sharepoint Designer and edit the CQWP.
2. Open 'Managed Contents and structure' option and edit the style library - item style.
Refer for details at:
http://www.helloitsliam.com/archive/2007/07/19/moss2007-%E2%80%93-show-multiple-columns-in-cqwp.aspx
Happy Customization!!!!!
Labels:
Content Query Webpart,
CQWP customization,
div
Monday, January 12, 2009
Sharepoint 2007 Contents and Structure
Move data from one document Library to another in sharepoint 2007 with out metadata change.
Steps:
Steps:
We can use ‘Manage Contents and Structure’ action available within sharepoint to move contents in one sharepoint site to another without loosing the metadata properties of the data stored.
Step 1 : From Site Actions à Select ‘Manage Contents and Structure’.
 If ‘Managed Contents and Structure’ is not visible under ‘Site Actions’ then do either one or both of the following steps.
1. On the Site Settings page, in the Site Administration section, click Site features.
Next to Office SharePoint Server Publishing, click Activate
2 .If you are not at the root of your site, under Site Collection Administration, click Go to top level site settings.
On the Site Settings page, under Site Collection Administration, click Site collection features.
On the Site Collection Features page, next to Office SharePoint Server Publishing Infrastructure, click Activate
Step 2 : Select the document library from where you want to move the data at the left hand side menu,
At the right hand side, select the files you want to move to the new location.
Step 1 : From Site Actions à Select ‘Manage Contents and Structure’.
 If ‘Managed Contents and Structure’ is not visible under ‘Site Actions’ then do either one or both of the following steps.
1. On the Site Settings page, in the Site Administration section, click Site features.
Next to Office SharePoint Server Publishing, click Activate
2 .If you are not at the root of your site, under Site Collection Administration, click Go to top level site settings.
On the Site Settings page, under Site Collection Administration, click Site collection features.
On the Site Collection Features page, next to Office SharePoint Server Publishing Infrastructure, click Activate
Step 2 : Select the document library from where you want to move the data at the left hand side menu,
At the right hand side, select the files you want to move to the new location.
 From the ‘Actions’ tab select the ‘Move’ option.
You can select ‘Copy’ option if you only want to copy the data to the new location.
From the new pop up screen select the location where you want to add the contents.
Step 3 : Select Ok to start the process.

Drawbacks:
Only applicable if both the sites are part of a site collection.
Can maintain only the metadata properties of files, not applicable for folders.

Drawbacks:
Only applicable if both the sites are part of a site collection.
Can maintain only the metadata properties of files, not applicable for folders.
Refer following link for more details.
http://office.microsoft.com/en-us/sharepointserver/HA101317231033.aspx.
http://office.microsoft.com/en-us/sharepointserver/HA101317231033.aspx.
Subscribe to:
Comments (Atom)

_530.jpg)
