To login back to the same page from wher eyou got logged out from - Sharepoint FBA
Uri MyLastURL;
protected void Page_Load(object sender, EventArgs e)
{
if (!IsPostBack)
{
MyLastURL = Request.UrlReferrer;
ViewState["LastURL"] = MyLastURL.AbsoluteUri;
}
}
protected void Login_Click(object sender, EventArgs e)
{ //After successful authentication do Response.Redirect
Response.Redirect(ViewState["LastURL"]);
}
Wednesday, May 12, 2010


Tuesday, May 11, 2010
Rest App Pool with out doing IISRESET
Tips : #1 : Rest App Pool with out doing IISRESET can be donw with the help of :
cscript c:\windows\system32\iisapp.vbs /a "SharePointAppPool" /r
eg : cscript c:\windows\system32\iisapp.vbs /a "SharePoint - 222" /r
Tips : #2 : Generate Public Key Token for the assembly
Open Visual Studio 2005/ 2008 - At Tools - External Tools - Select -Add.

Give Title : Get Public Key Token
Add Command : Browse to Drive:\ProgramFiles\Microsoft Visual Studio 8.0\SDK\v2.0\Bin\sn.exe.
Add Arguments: -Tp "$(TargetPath)".
cscript c:\windows\system32\iisapp.vbs /a "SharePointAppPool" /r
eg : cscript c:\windows\system32\iisapp.vbs /a "SharePoint - 222" /r
Tips : #2 : Generate Public Key Token for the assembly
Open Visual Studio 2005/ 2008 - At Tools - External Tools - Select -Add.

Add Command : Browse to Drive:\ProgramFiles\Microsoft Visual Studio 8.0\SDK\v2.0\Bin\sn.exe.
Add Arguments: -Tp "$(TargetPath)".
Wednesday, May 5, 2010
Create document library groupings based on calculated column
Hi,
I saw the above query resolved in a very easy manner by my team mate which i though of adding here so that it can help some one else and is a common requirement.
So, the question is how we can create groupings based on calculated column in a document library where the grouping should be in in bunches of '50'.
So the easiest solution for acheive the same is to create a calculated column, add the below formula, and to create a grouping based on the calculated field.
=INT(REPLACE(GROUPFIELD,1,2,"")/50,1)
*assuming the field name as GROUPFIELD which is a single line of text
Forums Link : http://social.technet.microsoft.com/Forums/en-US/sharepointgeneral/thread/81e0df1b-1945-4fdb-a2b7-ab8d597df439
I saw the above query resolved in a very easy manner by my team mate which i though of adding here so that it can help some one else and is a common requirement.
So, the question is how we can create groupings based on calculated column in a document library where the grouping should be in in bunches of '50'.
So the easiest solution for acheive the same is to create a calculated column, add the below formula, and to create a grouping based on the calculated field.
=INT(REPLACE(GROUPFIELD,1,2,"")/50,1)
*assuming the field name as GROUPFIELD which is a single line of text
Forums Link : http://social.technet.microsoft.com/Forums/en-US/sharepointgeneral/thread/81e0df1b-1945-4fdb-a2b7-ab8d597df439
Friday, April 23, 2010
Batch Process- MetaData update
Hi All,
My friend came up with a requirement to autoupdate metadata fields in a document library when proceeding with a bulk upload activity.
Requirements:
In the example here im updating two fields Details, and Approved which i am updating using batch process,
The field Approved is a Yes/No field with default value of 'No'.
So i m updating the Details field with 'Update description and time' and the Approved field to 'Yes'.
Note : I'm retreiving and updating the - Created, Created By, Modified, Modifed By - as i couldnt find a way to retain the version as we do in object model coding using SystemUpdate() instead of Update().
Code :-
"<ows:Batch OnError=\"Return\">{0}</ows:Batch>";
string methodFormat = "<Method ID=\"{0}\">" +
"<SetList>{1}</SetList>" +
"<SetVar Name=\"Cmd\">Save</SetVar>" +
"<SetVar Name=\"ID\">{2}</SetVar>" +
"<SetVar Name=\"urn:schemas-microsoft-com:office:office#Approved\">{3}</SetVar>" +
"<SetVar Name=\"urn:schemas-microsoft-com:office:office#Details\">{4}</SetVar>" +
"<SetVar Name=\"urn:schemas-microsoft-com:office:office#Created\">{5}</SetVar>" +
"<SetVar Name=\"urn:schemas-microsoft-com:office:office#Created_x0020_By\">{6}</SetVar>"
"<SetVar Name=\"urn:schemas-microsoft-com:office:office#Modified\">{7}</SetVar>" +
"<SetVar Name=\"urn:schemas-microsoft-com:office:office#Modified_x0020_By\">{8}</SetVar>" +"</Method>";
string querystring = "<Where><And><Eq><FieldRef Name='Approved' />"+
"<Value Type='Boolean'>No</Value></Eq><Eq><FieldRef Name='Created' />" +
"<Value Type='DateTime'>{0}</Value></Eq></And></Where>";
SPList currentlist = currentweb.Lists["DocLib"];
//just to make sure no versioning is happening. currentlist.EnableVersioning = false;
My friend came up with a requirement to autoupdate metadata fields in a document library when proceeding with a bulk upload activity.
Requirements:
- Update multiple metadata fields.
- Fast process (If we use sharepoint DOM it wont be very fast- takes 2-3 minutes and increases as the no of items increase).
- No new versions should be created on updation
In the example here im updating two fields Details, and Approved which i am updating using batch process,
The field Approved is a Yes/No field with default value of 'No'.
So i m updating the Details field with 'Update description and time' and the Approved field to 'Yes'.
Note : I'm retreiving and updating the - Created, Created By, Modified, Modifed By - as i couldnt find a way to retain the version as we do in object model coding using SystemUpdate() instead of Update().
Code :-
StringBuilder batchprocessbuilder = new StringBuilder();
string batchFormat = "<?xml version=\"1.0\" encoding=\"UTF-8\"?>" + try{"<ows:Batch OnError=\"Return\">{0}</ows:Batch>";
string methodFormat = "<Method ID=\"{0}\">" +
"<SetList>{1}</SetList>" +
"<SetVar Name=\"Cmd\">Save</SetVar>" +
"<SetVar Name=\"ID\">{2}</SetVar>" +
"<SetVar Name=\"urn:schemas-microsoft-com:office:office#Approved\">{3}</SetVar>" +
"<SetVar Name=\"urn:schemas-microsoft-com:office:office#Details\">{4}</SetVar>" +
"<SetVar Name=\"urn:schemas-microsoft-com:office:office#Created\">{5}</SetVar>" +
"<SetVar Name=\"urn:schemas-microsoft-com:office:office#Created_x0020_By\">{6}</SetVar>"
"<SetVar Name=\"urn:schemas-microsoft-com:office:office#Modified\">{7}</SetVar>" +
"<SetVar Name=\"urn:schemas-microsoft-com:office:office#Modified_x0020_By\">{8}</SetVar>" +"</Method>";
string querystring = "<Where><And><Eq><FieldRef Name='Approved' />"+
"<Value Type='Boolean'>No</Value></Eq><Eq><FieldRef Name='Created' />" +
"<Value Type='DateTime'>{0}</Value></Eq></And></Where>";
using (SPWeb currentweb = SPContext.Current.Web){
SPList currentlist = currentweb.Lists["DocLib"];
//just to make sure no versioning is happening. currentlist.EnableVersioning = false;
currentlist.Update();
string listID = currentlist.ID.ToString();
SPQuery query = new SPQuery();
string datetoday = SPUtility.CreateISO8601DateTimeFromSystemDateTime(DateTime.Now);
query.Query = string.Format(querystring, datetoday);
query.ViewAttributes = "Scope= 'Recursive'";
SPListItemCollection listcollectn = currentlist.GetItems(query);
//fileds updating........
int boolApproved = 1;
string strDetails = "UpdateMetaData" +Convert.ToString(DateTime.Now);
SPListItem item = null;
//Use only for loop, foreach will hang a lot....
for(int i=0; i<listcollectn.Count; i++){
int itemID = listcollectn[i].ID;
item = listcollectn.GetItemById(itemID);
DateTime itemdate = Convert.ToDateTime(item["Created"].ToString());
string date = SPUtility.CreateISO8601DateTimeFromSystemDateTime(itemdate);
batchprocessbuilder.AppendFormat(methodFormat, itemID, listID, itemID, boolApproved, strDetails, date, item["Author"], date, item["Author"]);}
string batch = string.Empty;
batch = string.Format(batchFormat, batchprocessbuilder.ToString());
string batchresults = currentweb.ProcessBatchData(batch);
currentlist.EnableVersioning = true;
currentlist.Update();}
}}catch (Exception ex){}
Method : 2 : Using Webservice and Jquery
ref: http://www.sharepointresource.com/category/jQuery.aspx
http://weblogs.asp.net/jan/archive/2009/05/06/querying-sharepoint-list-items-using-jquery.aspx
<soapenv:Envelope xmlns:soapenv="http://schemas.xmlsoap.org/soap/envelope/"
xmlns:soap="http://schemas.microsoft.com/sharepoint/soap/">
<soapenv:Header />
<soapenv:Body>
<soap:UpdateListItems>
<soap:listName>Contacts</soap:listName>
<soap:updates>
<Batch OnError='Continue' ListVersion='1'>
<Method ID='2' Cmd='Update'>
<Field Name='ID'>4</Field>
<Field Name='Title'>Last_Name</Field>
<Field Name='FirstName'>First_Name</Field>
</Method>
</Batch>
</soap:updates>
</soap:UpdateListItems>
</soapenv:Body>
</soapenv:Envelope>
We can use :
Create: <Method ID='1' Cmd='New'>
Update: <Method ID='2' Cmd='Update'>
Delete: <Method ID='3' Cmd='Delete'>
string listID = currentlist.ID.ToString();
SPQuery query = new SPQuery();
string datetoday = SPUtility.CreateISO8601DateTimeFromSystemDateTime(DateTime.Now);
query.Query = string.Format(querystring, datetoday);
query.ViewAttributes = "Scope= 'Recursive'";
SPListItemCollection listcollectn = currentlist.GetItems(query);
//fileds updating........
int boolApproved = 1;
string strDetails = "UpdateMetaData" +Convert.ToString(DateTime.Now);
SPListItem item = null;
//Use only for loop, foreach will hang a lot....
for(int i=0; i<listcollectn.Count; i++){
int itemID = listcollectn[i].ID;
item = listcollectn.GetItemById(itemID);
DateTime itemdate = Convert.ToDateTime(item["Created"].ToString());
string date = SPUtility.CreateISO8601DateTimeFromSystemDateTime(itemdate);
batchprocessbuilder.AppendFormat(methodFormat, itemID, listID, itemID, boolApproved, strDetails, date, item["Author"], date, item["Author"]);}
string batch = string.Empty;
batch = string.Format(batchFormat, batchprocessbuilder.ToString());
string batchresults = currentweb.ProcessBatchData(batch);
currentlist.EnableVersioning = true;
currentlist.Update();}
}}catch (Exception ex){}
Method : 2 : Using Webservice and Jquery
ref: http://www.sharepointresource.com/category/jQuery.aspx
http://weblogs.asp.net/jan/archive/2009/05/06/querying-sharepoint-list-items-using-jquery.aspx
<soapenv:Envelope xmlns:soapenv="http://schemas.xmlsoap.org/soap/envelope/"
xmlns:soap="http://schemas.microsoft.com/sharepoint/soap/">
<soapenv:Header />
<soapenv:Body>
<soap:UpdateListItems>
<soap:listName>Contacts</soap:listName>
<soap:updates>
<Batch OnError='Continue' ListVersion='1'>
<Method ID='2' Cmd='Update'>
<Field Name='ID'>4</Field>
<Field Name='Title'>Last_Name</Field>
<Field Name='FirstName'>First_Name</Field>
</Method>
</Batch>
</soap:updates>
</soap:UpdateListItems>
</soapenv:Body>
</soapenv:Envelope>
We can use :
Create: <Method ID='1' Cmd='New'>
Update: <Method ID='2' Cmd='Update'>
Delete: <Method ID='3' Cmd='Delete'>
Wednesday, March 10, 2010
Archive SharePoint Document Library versions.
Requirement : Archive versions created in a document library to another document library on daily basis.
Study : There are vairuos option to try doing it, but to automate the process its better to go fir shareoint timer jobs.
Solution : Create timer jobs which starts on feature activation performing the requirement on daily basis.
http://www.andrewconnell.com/blog/archive/2007/01/10/5704.aspx
http://www.andrewconnell.com/blog/articles/CreatingCustomSharePointTimerJobs.aspx
Only difference from the example is that you have to use SPDailySchedule
http://msdn.microsoft.com/en-us/library/microsoft.sharepoint.spdailyschedule.aspx
2. Write code for perform versioning in the document library
public override void Execute (Guid contentDbId) {
try
{
string[] urlofFile = null;
string url = string.Empty;
byte[] dBytes = null;
StringBuilder verID = new StringBuilder(10);
SPFileVersionCollection vercol = null;
SPFile file = null;
//Call webapplication
SPWebApplication webApplication = this.Parent as SPWebApplication;
SPContentDatabase contentDataBase = webApplication.ContentDatabases [contentDBGuid];
//call document librarys
SPDocumentLibrary doclib1 = (SPDocumentLibrary)contentDataBase.Sites[0].RootWeb.Lists ["DocLib"];
//Archival doc library
SPDocumentLibrary doclib2 = (SPDocumentLibrary)contentDataBase.Sites[0].RootWeb.Lists["Archives"];
//get current web
SPWeb currentweb = contentDataBase.Sites[0].RootWeb;
//get filecollection.
SPFileCollection filecols = currentweb.GetFolder("/DocLib").Files;
//Call Spfolder to add items to the archive.
SPFolder doclib2Folder = currentweb.Folders["/Archives"];
foreach (SPListItem items in doclib.Items){
//file object to get the files stored in doclib
file = items.File;
if (file.Exists){
string fileurl = file.Url.ToString();
//get collection of fileversions.
vercol = filecols[fileurl].Versions;
//Add the versions to Archive documents library if not a current version.
foreach (SPFileVersion ver in vercol){
if (!ver.IsCurrentVersion){
verID = verID.Append(ver.ID);
verID = verID.Append(",");
urlofFile = ver.File.Name.Split('.');
//Add version ID of the file version for uniqueness
url = urlofFile[0].ToString() + ver.ID + "." + urlofFile[1].ToString();
//get the versions of the file.
dBytes = ver.OpenBinary();
//Add it to Archive doclibrary
currentweb.AllowUnsafeUpdates = true;
doclib2Folder.Files.Add(url, dBytes);
doclib2.Update();
currentweb.AllowUnsafeUpdates = false;
}}
//Delete the versions from the current document library
if (!string.IsNullOrEmpty(verID.ToString())){
string[] vervalues = verID.ToString().TrimEnd(',').Split(',');
int i = 0;
foreach (string s in vervalues){
currentweb.AllowUnsafeUpdates = true;
i = Convert.ToInt32(s);
vercol.GetVersionFromID(i).Delete();
currentweb.AllowUnsafeUpdates = false;
}verID.Length = 0;
}}}}
catch (Exception ex)
{//Handle Exceptions....}
}
3. Deploy the solution as a feauture to your shareoint solution and activate the feature.
Happy Coding...........
Study : There are vairuos option to try doing it, but to automate the process its better to go fir shareoint timer jobs.
Solution : Create timer jobs which starts on feature activation performing the requirement on daily basis.
- Create Timer job in a feature.
http://www.andrewconnell.com/blog/archive/2007/01/10/5704.aspx
http://www.andrewconnell.com/blog/articles/CreatingCustomSharePointTimerJobs.aspx
Only difference from the example is that you have to use SPDailySchedule
http://msdn.microsoft.com/en-us/library/microsoft.sharepoint.spdailyschedule.aspx
2. Write code for perform versioning in the document library
public override void Execute (Guid contentDbId) {
try
{
string[] urlofFile = null;
string url = string.Empty;
byte[] dBytes = null;
StringBuilder verID = new StringBuilder(10);
SPFileVersionCollection vercol = null;
SPFile file = null;
//Call webapplication
SPWebApplication webApplication = this.Parent as SPWebApplication;
SPContentDatabase contentDataBase = webApplication.ContentDatabases [contentDBGuid];
//call document librarys
SPDocumentLibrary doclib1 = (SPDocumentLibrary)contentDataBase.Sites[0].RootWeb.Lists ["DocLib"];
//Archival doc library
SPDocumentLibrary doclib2 = (SPDocumentLibrary)contentDataBase.Sites[0].RootWeb.Lists["Archives"];
//get current web
SPWeb currentweb = contentDataBase.Sites[0].RootWeb;
//get filecollection.
SPFileCollection filecols = currentweb.GetFolder("/DocLib").Files;
//Call Spfolder to add items to the archive.
SPFolder doclib2Folder = currentweb.Folders["/Archives"];
foreach (SPListItem items in doclib.Items){
//file object to get the files stored in doclib
file = items.File;
if (file.Exists){
string fileurl = file.Url.ToString();
//get collection of fileversions.
vercol = filecols[fileurl].Versions;
//Add the versions to Archive documents library if not a current version.
foreach (SPFileVersion ver in vercol){
if (!ver.IsCurrentVersion){
verID = verID.Append(ver.ID);
verID = verID.Append(",");
urlofFile = ver.File.Name.Split('.');
//Add version ID of the file version for uniqueness
url = urlofFile[0].ToString() + ver.ID + "." + urlofFile[1].ToString();
//get the versions of the file.
dBytes = ver.OpenBinary();
//Add it to Archive doclibrary
currentweb.AllowUnsafeUpdates = true;
doclib2Folder.Files.Add(url, dBytes);
doclib2.Update();
currentweb.AllowUnsafeUpdates = false;
}}
//Delete the versions from the current document library
if (!string.IsNullOrEmpty(verID.ToString())){
string[] vervalues = verID.ToString().TrimEnd(',').Split(',');
int i = 0;
foreach (string s in vervalues){
currentweb.AllowUnsafeUpdates = true;
i = Convert.ToInt32(s);
vercol.GetVersionFromID(i).Delete();
currentweb.AllowUnsafeUpdates = false;
}verID.Length = 0;
}}}}
catch (Exception ex)
{//Handle Exceptions....}
}
3. Deploy the solution as a feauture to your shareoint solution and activate the feature.
Happy Coding...........
Tuesday, March 9, 2010
Create Modify Views and columns In SharePoint Survey....
Had you ever tried creating a new view in sharepoint survey list ?
You won't find an option to do it by default but still you can do it for a sharepoint survey.
Find the steps below >> Create New View
Find the steps below >> Create New Column.
Enjoy Customisation...........
You won't find an option to do it by default but still you can do it for a sharepoint survey.
Find the steps below >> Create New View
- Open the new view page of any list in your sharepoint site, and copy the URL to a notepad.
- Open survey settings page, and from the URL copy the List ID. (List=%7Bxxxxxxxx%2Dxxxx%2Dxxxx%2Dxxxx%2Dxxxxxxxxxxxx%7D).
- Replace the list name to the last of the URL with the survey list name.
Find the steps below >> Create New Column.
- Same the way you did for survey view, copy the new column page url (/_layouts/fldNew.aspx?ListID)
- Replace the ListID with the survey list ID and you are done.
- Inorder to perform the modify view of the newly created view as per the steps above, just add your list as a webpart to any sharepoint page.
- In the modify shared webpart option, select the view which you want to edit in the Selected View and select the option 'Edit the current view'.
Enjoy Customisation...........
Wednesday, December 23, 2009
Sharepoint Reports using Sharepoint Designer 2007
I was searching a lot for tools which can generate reports for me in sharepoint for many requirements like site usage, find the modified item in a document library, who all have modified a document in a document library, who had mad changes in the site..
The final answer on how to acheive all the same was simple.
Use Sharepoint Designer 2007
Yes, you can generate all the reports, create charts and even export them to excel from the sharepoint designer 2007. Open your site using sharepoint designer and at Site -> Reports, you can find almost all the options you are looking for......
Find this how to Article with more details.
The final answer on how to acheive all the same was simple.
Use Sharepoint Designer 2007
Yes, you can generate all the reports, create charts and even export them to excel from the sharepoint designer 2007. Open your site using sharepoint designer and at Site -> Reports, you can find almost all the options you are looking for......
Find this how to Article with more details.
Friday, December 18, 2009
Restrict document library from uploading and opening in Explorer view
Are you trying to restrict sharepoint users from adding files to the sharepoint document library via, Upload document option and using 'Drag and Drop' after opening in Explorer view.
You can acheive this by just adding some javascript codes to the page.
So heres how it can be done ...........
You are done with what you were looking for
You can acheive this by just adding some javascript codes to the page.
So heres how it can be done ...........
Open the document library where you want to restrict the upload and open in explorer view option.
Add a Content Editor Webpart to the page.
In the tool pane of the CEWP - Source Editor.- Add the below javacript codes.
Delete the explorer view of document library.

Tuesday, December 8, 2009
Export to excel
IF you find export to excel not working in any version of sharepoint installed then try out this noce solution which helps you out.
Download- Run - Activate , you are done to use the feature.
Download it from : http://www.vana.in/Pages/ExportToExcel.aspx
Download- Run - Activate , you are done to use the feature.
Download it from : http://www.vana.in/Pages/ExportToExcel.aspx
Tuesday, November 3, 2009
Who deleted the site/list/library
Hi All,
I was asked by many queries how to find the person who deleted the site, list, library. list column etc... in a sharepoint site.
Today i found the solution.
Configure your IIS logs for all the sites on Hourly basis at IIS - website - Right click - properties- Website - Enable logging - properties ( assgin an easy path) -Advanced- Hourly.
TO find th eperson who deleted, find the edit page in the IIS logs and find the name added to it.......
site >> "/_layouts/deleteweb"
list >> "/_layouts/editpage"
list column >> "_layouts/FldEditEx.aspx" etc....
I was asked by many queries how to find the person who deleted the site, list, library. list column etc... in a sharepoint site.
Today i found the solution.
Configure your IIS logs for all the sites on Hourly basis at IIS - website - Right click - properties- Website - Enable logging - properties ( assgin an easy path) -Advanced- Hourly.
TO find th eperson who deleted, find the edit page in the IIS logs and find the name added to it.......
site >> "/_layouts/deleteweb"
list >> "/_layouts/editpage"
list column >> "_layouts/FldEditEx.aspx" etc....
Thursday, October 15, 2009
Archive contents from Team Discussion
Steps : To archive the contents from the Team Discussion
1. Open 'Team Discussion'
2. Create a new view from 'Settings' - New View
3. In 'Columns'- Check the 'Body' field- OK
4. Open the newly created view and from 'Actions' select 'Export to spread sheet'.
5. Open the file in Excel and save it to your archive destination.
Note: The above steps will not save any attachments in the mails, For archiving the attachments.
1. On you computer - Open 'My Network Places'.
2. Under 'Network Tasks' click on Add a network place
3. Click 'Next'- Select Choose another service provider option - Next
4. Add the above url of the 'Team Discussion' as network address- Next
5. Give a new name - Next - Finish
6. A new web page will be opened with Folders for each mail.
7. Select the folders with the attachment and save them. ( The folders name will be same as the subject of the mail)
1. Open 'Team Discussion'
2. Create a new view from 'Settings' - New View
3. In 'Columns'- Check the 'Body' field- OK
4. Open the newly created view and from 'Actions' select 'Export to spread sheet'.
5. Open the file in Excel and save it to your archive destination.
Note: The above steps will not save any attachments in the mails, For archiving the attachments.
1. On you computer - Open 'My Network Places'.
2. Under 'Network Tasks' click on Add a network place
3. Click 'Next'- Select Choose another service provider option - Next
4. Add the above url of the 'Team Discussion' as network address- Next
5. Give a new name - Next - Finish
6. A new web page will be opened with Folders for each mail.
7. Select the folders with the attachment and save them. ( The folders name will be same as the subject of the mail)
Wednesday, September 9, 2009
Update Global Navigation Link
I was looking for a way to update the global navigation breadcum in a sharepoint site and doesn't found any valid solutions. 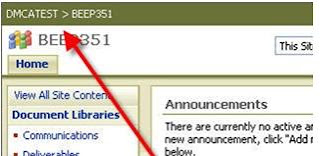
Today i got a chance to refer a white paper published by microsoft which gives the steps which many may have noticed.
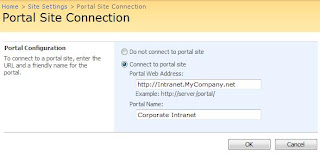

You can edit the portal site link at
Site Action site settings --> Under Site Administration -->Portal Site Connection.
Cheers!
Wednesday, July 1, 2009
Remove #NUM from the list data difference
To remove the #NUM from the resilt of taking difference between two sharepoint column values.
Here is a scenario :
There are two dates , date1 and date 2
date 2 - date1 will give result if date 2 is after date1, if not it will give the result #NUM
This can be resolve by using this formula :
=IF(ISERROR(DATEDIF(Date1,Date2,"d")), -DATEDIF(Date1,Date2,"d"))
If the difference between the two dates is negative ( ie, Date1 - Date2 = -ve value ) then it will return -(Date2-Date1)
for eg : 2008/02/02 - 2008/02/01 will give 1 as value, but 2008/02/01 - 2008/02/02 will give #NUM as result normally, but the above calculated will give -1 as result.
Cheers!!
Here is a scenario :
There are two dates , date1 and date 2
date 2 - date1 will give result if date 2 is after date1, if not it will give the result #NUM
This can be resolve by using this formula :
=IF(ISERROR(DATEDIF(Date1,Date2,"d")), -DATEDIF(Date1,Date2,"d"))
If the difference between the two dates is negative ( ie, Date1 - Date2 = -ve value ) then it will return -(Date2-Date1)
for eg : 2008/02/02 - 2008/02/01 will give 1 as value, but 2008/02/01 - 2008/02/02 will give #NUM as result normally, but the above calculated will give -1 as result.
Cheers!!
Tuesday, June 23, 2009
Calculate age in sharepoint list
Hi All,
i started trying to answer a question in mocrosoft forums which has gone a long way today and this is my third editing of the post.
How to calculate age in a sharepoint list with only date of birth available.
it can be done with the formula listed below :
=FLOOR((DATEDIF(DOB,Todaydate,"d")-(ROUND(((YEAR(Todaydate))-YEAR(DOB))/4,0)))/365,1)
Now i will explain what the fields are:
DOB- date of birth Field in the sharepoint list.
Todaysdate - gives you the date today but need to carry difficult step to get it. you cannot get todays date directly anywhere in sharepoint list, thats sure.
i got it via, the steps given at :
http://abstractspaces.wordpress.com/2008/05/19/use-today-and-me-in-calculated-column/
now what the formula does :
First it takes the difference between todays date and DOB. then substracts the no of leap years from it, divide it by 365 and took a round value.
Cheers!!!
i started trying to answer a question in mocrosoft forums which has gone a long way today and this is my third editing of the post.
How to calculate age in a sharepoint list with only date of birth available.
it can be done with the formula listed below :
=FLOOR((DATEDIF(DOB,Todaydate,"d")-(ROUND(((YEAR(Todaydate))-YEAR(DOB))/4,0)))/365,1)
Now i will explain what the fields are:
DOB- date of birth Field in the sharepoint list.
Todaysdate - gives you the date today but need to carry difficult step to get it. you cannot get todays date directly anywhere in sharepoint list, thats sure.
i got it via, the steps given at :
http://abstractspaces.wordpress.com/2008/05/19/use-today-and-me-in-calculated-column/
now what the formula does :
First it takes the difference between todays date and DOB. then substracts the no of leap years from it, divide it by 365 and took a round value.
Cheers!!!
Monday, June 22, 2009
_530.jpg)
Wednesday, March 11, 2009
Content Query Webpart customization
In sharepont if you want to show the contacts from another site in your site the best option is to go for content query web part , the advantage is that when ever a change happens to contact in the site will get autoupdate in the CQWP.
When you try to add the 'Contact' list from another site, You will come across one constrain usually, ie. the display of div tags below the contact name.
You don't have to go for any other editors to sort out the issue.
One simple solution is to play with the 'Presentation' of the CQWP page.
You can remove the tags div easily by changing the CQWP style as shown below.
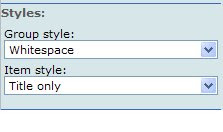
And what if you want to show all the fields other than the 'Title: Last Name' field.
You have got 2 options:
1. Open Sharepoint Designer and edit the CQWP.
2. Open 'Managed Contents and structure' option and edit the style library - item style.
Refer for details at:
http://www.helloitsliam.com/archive/2007/07/19/moss2007-%E2%80%93-show-multiple-columns-in-cqwp.aspx
Happy Customization!!!!!
When you try to add the 'Contact' list from another site, You will come across one constrain usually, ie. the display of div tags below the contact name.
You don't have to go for any other editors to sort out the issue.
One simple solution is to play with the 'Presentation' of the CQWP page.
You can remove the tags div easily by changing the CQWP style as shown below.

And what if you want to show all the fields other than the 'Title: Last Name' field.
You have got 2 options:
1. Open Sharepoint Designer and edit the CQWP.
2. Open 'Managed Contents and structure' option and edit the style library - item style.
Refer for details at:
http://www.helloitsliam.com/archive/2007/07/19/moss2007-%E2%80%93-show-multiple-columns-in-cqwp.aspx
Happy Customization!!!!!
Monday, January 12, 2009
Sharepoint 2007 Contents and Structure
Move data from one document Library to another in sharepoint 2007 with out metadata change.
Steps:
Steps:
We can use ‘Manage Contents and Structure’ action available within sharepoint to move contents in one sharepoint site to another without loosing the metadata properties of the data stored.
Step 1 : From Site Actions à Select ‘Manage Contents and Structure’.
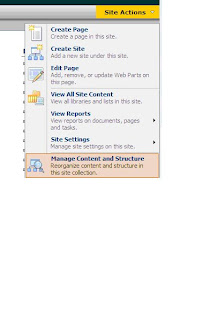 If ‘Managed Contents and Structure’ is not visible under ‘Site Actions’ then do either one or both of the following steps.
1. On the Site Settings page, in the Site Administration section, click Site features.
Next to Office SharePoint Server Publishing, click Activate
2 .If you are not at the root of your site, under Site Collection Administration, click Go to top level site settings.
On the Site Settings page, under Site Collection Administration, click Site collection features.
On the Site Collection Features page, next to Office SharePoint Server Publishing Infrastructure, click Activate
Step 2 : Select the document library from where you want to move the data at the left hand side menu,
At the right hand side, select the files you want to move to the new location.
Step 1 : From Site Actions à Select ‘Manage Contents and Structure’.
 If ‘Managed Contents and Structure’ is not visible under ‘Site Actions’ then do either one or both of the following steps.
1. On the Site Settings page, in the Site Administration section, click Site features.
Next to Office SharePoint Server Publishing, click Activate
2 .If you are not at the root of your site, under Site Collection Administration, click Go to top level site settings.
On the Site Settings page, under Site Collection Administration, click Site collection features.
On the Site Collection Features page, next to Office SharePoint Server Publishing Infrastructure, click Activate
Step 2 : Select the document library from where you want to move the data at the left hand side menu,
At the right hand side, select the files you want to move to the new location.
 From the ‘Actions’ tab select the ‘Move’ option.
You can select ‘Copy’ option if you only want to copy the data to the new location.
From the new pop up screen select the location where you want to add the contents.
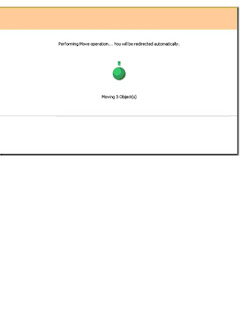
Step 3 : Select Ok to start the process.
Drawbacks:
Only applicable if both the sites are part of a site collection.
Can maintain only the metadata properties of files, not applicable for folders.

Drawbacks:
Only applicable if both the sites are part of a site collection.
Can maintain only the metadata properties of files, not applicable for folders.
Refer following link for more details.
http://office.microsoft.com/en-us/sharepointserver/HA101317231033.aspx.
http://office.microsoft.com/en-us/sharepointserver/HA101317231033.aspx.
Wednesday, August 27, 2008
Replacement for Categories Webpart .........
Getting the Categories web part working with site templates other than Site Directory template will not work so the option if you want site directory to be synchronized in your SharePoint enviornment is to go for Table of Contents web part which will provide with the same functionality the Categories webpart provide in Site Directory template, if needed you can also go ahead with customizing the TOC webpart Level wise as well as with the no of Columns displayed.
You can refer to the link below for more details.
http://office.microsoft.com/en-us/sharepointdesigner/HA101741441033.aspx.
Hopes this may help in solving your issue.
Regards,
Ajith T George.
You can refer to the link below for more details.
http://office.microsoft.com/en-us/sharepointdesigner/HA101741441033.aspx.
Hopes this may help in solving your issue.
Regards,
Ajith T George.
Subscribe to:
Posts (Atom)

